Sunday, 24 November 2013

Ripple sample

Here is a sneak peak of my ripple blanket colour scheme... What do you think?! I was too excited to show you all so i took this without any natural light so the colours are a little off :( 

I can't wait to start the blanket now; I have got the hang of the pattern so hopefully it will turn out really nice.


Saturday, 23 November 2013

Festive Pies

Last week I tried my hand at hot water crust pastry to make pork pies, they were a resounding success! This morning Tom and I decided to get festive; we made chicken and stuffing pies. For dinner last night I roasted a small chicken and four chicken thighs, we ate the breasts and the rest was left for pies.


Ingredients

for the hot water crust pastry...

  • 720g plain flour
  • 320ml water
  • 240g lard
  • 1 egg yolk (for glaze)

for the filling... 
you can use whatever you have, the following is what we used

  • leftover chicken, shredded
  • leftover gammon cubes and onion
  • stuffing

to prepare...

  • Cut 5cm wide strips of baking paper to wrap around your pies before cooking
  • Cut 20cm strips of string to hold the paper in place (wet the string to ensure it doesn't burn in the oven)
  • Preheat the oven to 200°C

Method

1) Prepare the filling by cutting up your meat and combining in a bowl with stuffing. Get your hands in and give it a good mix.

2) Shape filling into balls, roughly the size of a golf ball. It depends on how big you want your pies to be really. Set aside and start to make the pastry.

3) Cut the lard into cubes and add to the water, heat on the hob until the lard melts.

4) Weigh the flour out into a bowl and add the melted lard and water. Mix with a spoon first because it will be too hot to handle.

5) Combine to form a dough, it should be okay to handle once combined.

6) Roll the dough out on a floured work surface to about 5mm thickness, cut circles for cases and smaller circles for lids. (I used a cereal bowl for the cases and a glass for the lids)

7) Place a filling ball in the centre of a pastry case, wet the edges and form a case around the filling. Wet the edges of a pastry lid and pinch together until it looks like a little pork pie. It won't be pretty... but it will look rustic and homemade!

8) Wrap the pie in a strip of baking paper and tie with string. Repeat for all the pies.


9) Brush eat pie top with egg yolk.

10) Place on a baking tray with room for air to circulate between the pies.


11) Bake in the oven for 35 to 40 minutes, or until nicely browned.

12) remove from the oven and ENJOY!


These chicken and stuffing ones truly taste like Christmas, we even have cranberry sauce to dribble over them. I'd love to hear what you put in your pies and I would especially love to see pictures... please leave a link to your blog in the comments section.

Whilst the pies were cooking, I cleaned the kitchen and made DIPPY EGGS!!! you are never too old for dippy eggs. To stop any confusion dippy eggs are soft boiled eggs with toast soldiers. I even found a Milkybar kid egg cup with cowboy hat to go with it.


Dippy eggs are a far cry from my Christmas day breakfast. Tom enjoys croissants with bacon, stilton and cranberry sauce with Prosecco on Christmas day, my family opts for sausage butties and a bottle of Stella... you can tell who is Northern!


I will leave you with this... 31 days until Santa arrives! xx


Tuesday, 19 November 2013

I have ripples of excitement for this next project

Look what arrived in the post today... yarntasic, yarnilicious, yarnahoy!!


The weather is utterly miserable today which made photography a bit difficult; I had to line these up right next to the window to get any natural light on them.

When this lovely lot grow up they are going to be a Ripple blanket :) I will be using and adapting this pattern from Attic 24 and if my blanket turns out half as nice I will be so pleased.

I wanted the same yarn as I am using for my granny square blanket (Rico essentials 365 aran) but the colour range isn't as vast; this is Rico essentials cotton dk. They were purchased from Deramores on Sunday evening and have arrived this morning (Tuesday), I am very impressed with their service. Congratulations Deramores!

The colours I bought (left to right in picture) are:
1 - Cardinal (84)
2 - Silver (03)
3 - Blue Green (42)
4 - Mauve (17)
5 - Dusky Rose (19)
6 - Burgundy (00)
7 - Aqua (95)
8 - Anthracite (28)

Also sneaking in the picture, my giraffe slippers. A Christmas present last year and I love them! I always wear them in my flat, today they will be helping me through a very extensive lab report I have to write. So I need to put down all this lovely yarn, get out of creative mode, into scientist mode and write all about drugs I have been analysing. Wish me luck... x

Friday, 15 November 2013

All creatures great and small...

I had a weekend off crafting in order to go home and visit my family. Here are some pictures of some mimi pygmy goats (Cookie and Crumble) and two mini Shetland ponies (Dolly and Donna) who belong to my Mum's partner's neighbour. He lives in a small hamlet which we went to visit after a delightful Sunday roast.


Mini pygmy goat, I don't know if this is Cookie or Crumble.


My sister loves horses, unfortunately this stable does not belong to us.


A view across the fields on a crisp Sunday afternoon.


Cookie and Crumble playing in the field.


My sister with a normal sized horse and Dolly, the mini Shetland pony.


My brother feeding Dolly.


My mum talking to Dolly. She uses the same tone of voice to talk to animals and babies.


Dolly's mum, Donna.


My brother and Dolly again.


A proper Sunday roast with all the trimmings... it makes me hungry just looking at this picture.

I hope you have enjoyed looking at pictures of mini animals, what could be cuter?! More crafty posts to come in the future, pinky promise. xx


Tuesday, 12 November 2013

Movember

I have got in the Movember spirit by crocheting this moustache... brilliant for women (and those males who can't grow a moustache) to show their support for this fantastic cause and raise awareness.


Monday, 11 November 2013

Crochet Coffee Cup Cosy Pattern - No More Naked Coffees!

In recent weeks I have discovered coffee - and I love it! The University library has a Starbucks inside and I have visited more times than I care to admit. Sometimes my coffee can get neglected for a while if I 'get in the work zone' and ends up going a bit cool, I found this pattern on pinterest for a cute coffee cup cosy. I'm going to start a 'no more naked coffee cups' revolution!! (I'm getting a bit giddy now... maybe it's all the caffeine)


This is not my pattern, the original pattern can be found here. I have simply translated the pattern from US to UK crochet terminology.
The one I have made uses scraps of Rico cotton so it is easy to chuck in the washing machine to get rid of all the drip stains. It keeps my cup looking cute and my coffee warm.
You will need...
  • Scraps of yarn, I have used some Rico cotton leftover from making my granny square blanket
  • Crochet hook
  • Cute button
  • Needle

Abbreviations:
  • ch - chain
  • dc - double crochet
  • tr - treble crochet
  • htr - half treble crochet

Pattern (UK crochet terminology)
Ch 8.
Row 1: 1dc 1tr in second ch from hook, *skip next ch, 1dc 1tr in next ch, repeat from * to end of row, ch1 turn.
Row 2: *Skip next stitch, 1dc 1tr in next stitch, repeat from * to end of row, ch 1 turn.
Rep Row 2 until work measures 8 inches from beginning.
Next row: Skip 1st stitch, slip stitch in the next 2 stitches, 1 htr in each of the next 4 stitches, turn ch1.
You will now be working on these 4 stitches to make button hole strip.
Next row: 1 htr in each stitch, ch1 turn.
Rep last row until button hole strip measures 2″.
Next row: 1 htr in 1st stitch, ch 2 and skip next 2 stitches, 1 htr in last stitch.
Work dc border evenly around, working 3 dc in corners and 2 dc into ch2 button hole space. Join with a slip stitch in 1st dc.
Fasten off and weave in ends. Sew on button.


Enjoy! xx

Tuesday, 5 November 2013

Sneak Peek

As mentioned previously, I have revised the pattern I made for baby mittens. The other evening a new pair were cast on in yellow and a dusky purple (Sirdar snuggly baby wool, I can't find the labels)... and here is a sneak peek!


Unfortunately my phone camera hasn't captured the colours quite right :(

Pictures of the completed mittens coming soon!

This is also my first post via the android blogging app so I do hope it works okay. I am currently on my way to the craft shop as a break from uni work. X

ATTENTION: FREE YARN

Okay, so it might only be free if you win but still... 'gotta be in it to win it'. Just click on the link below to visit a lovely place in blogland and follow the instructions.

http://vintagesheetaddict.blogspot.co.uk/2013/10/yummy-yarn-giveaway.html

Good luck! Not too much though; I have my eye on it ;) haha. x

Monday, 4 November 2013

Busy, busy baker

I have been meaning to write a post for a while now but I just didn't have anything crafty to write about. I didn't want to bore you with details of my life: get up, go to uni, go to library, make dinner, go to sleep. Unfortunately, since learning to crochet last month I have developed an acute granny square addiction so any crafty time has been spent doing those.

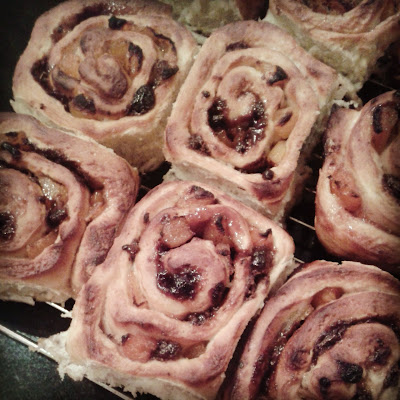
With the lack of variety craft-wise I have been doing a bit of baking. A few weeks ago I made mini victoria sandwich cakes which were a massive hit! So when I asked Tom what he would like me to bake yesterday he requested those again but I also wanted to try something a little different... I decided on apricot chelsea buns. 


I used the Paul Hollywood recipe  as I have never made dough before. I added apricots, raspberry jam and chunks of chocolate. They turned out very well but I will probably omit the chocolate next time because the chunks poking out look a bit burnt.


The first time I baked the sponge cake mixture in a swiss roll tin and used a circle cutter (it was actually the plastic lid from a deodorant can which I washed) to make the shapes before individually filling with jam and buttercream.


The second time I decided the first time created too much mess and fuss so baked the mixture in a square tin, split the cake in half, filled and then cut squares from it... quicker, less mess, not as cute but equally as delicious!


To prove I don't spend my life eating cake (oh how I wish I could) I snapped this colourful picture of some veggies. They were turned into bolognese or chilli, I can't remember.


Aside from a lovely weekend of baking (and not so lovely uni work), Tom and I took a little trip on the train to Southport. It was freezing cold, windy and raining but we had a fab day! We went to watch Southport v Cambridge because one of Tom's friends currently plays football for Cambridge and he managed to get us some tickets. 


Our football day out in pictures: 
1) Underground train station. At this point I had every intention of photographing everything.
2) Checking our accumulator bets... we didn't win (as usual). 
3) It isn't a trip to a football match without lager and crisps right?! We had pies too but they didn't stick around long enough to be photographed! 
4) A double rainbow at half time.

COMING SOON

Late last night I cast on a pair of baby mittens after a slight pattern revision. 
Should be finished soon, eeeek!!